How to backup all your photos using the Photo Transfer Desktop App

How to backup all your photos using the Photo Transfer Desktop App

In this walk through we will show you how to backup all your photos using the Photo Transfer Desktop app that you can install free

Step 1
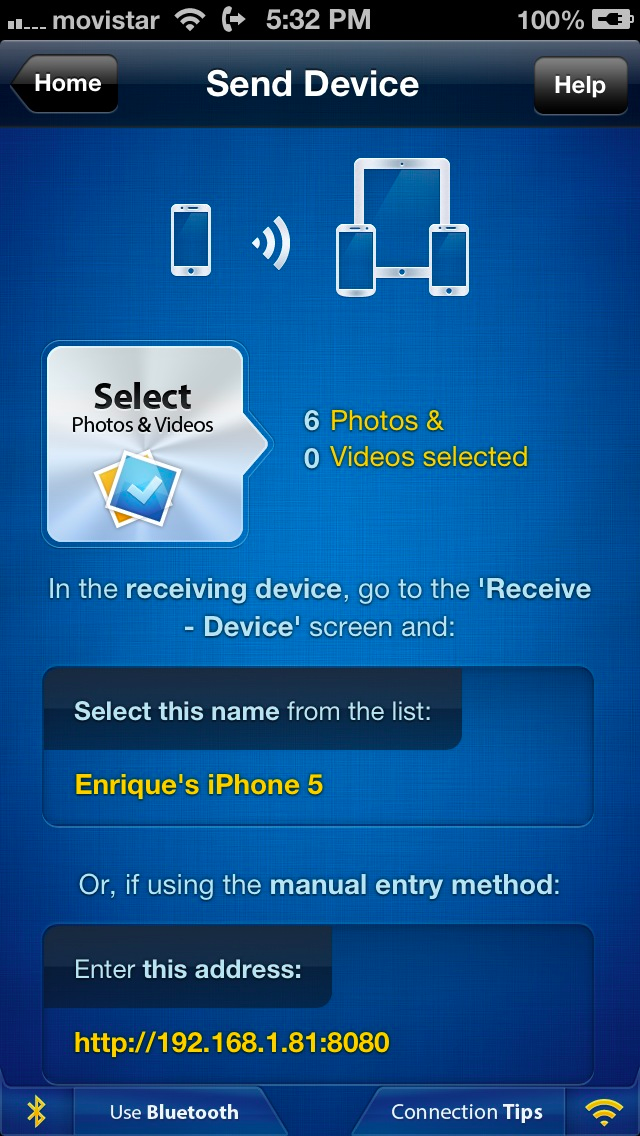
Make sure that your device is connected to the same wifi network as your computer. Launch the app on your device and computer.

Step 2
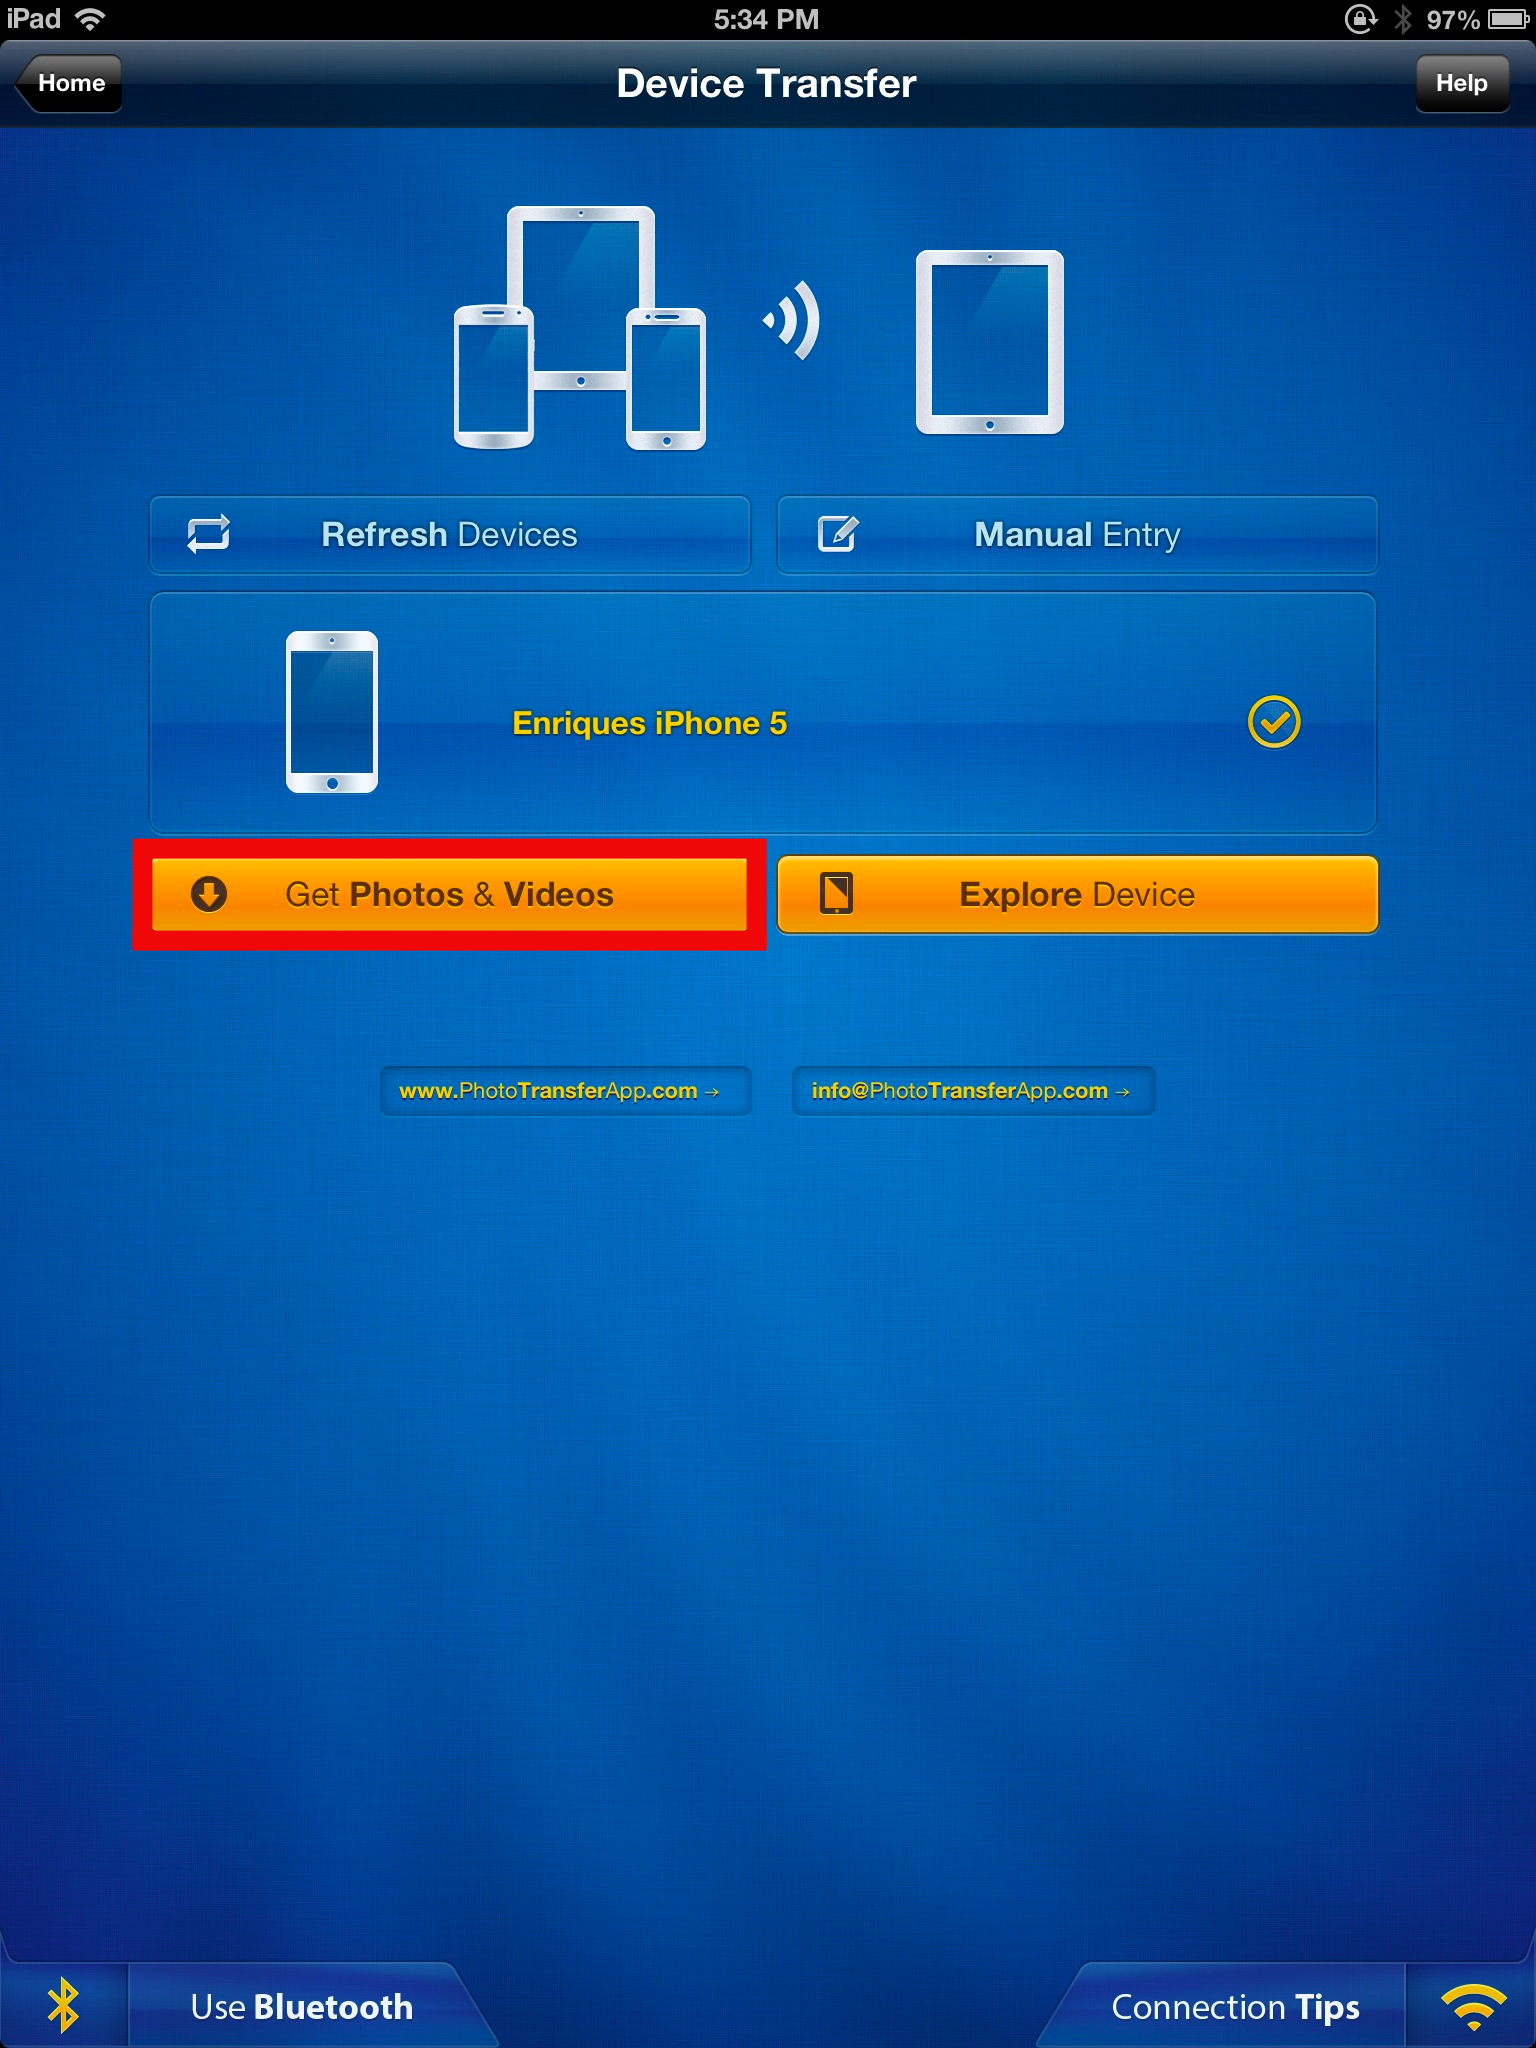
On the desktop app click on Discover Devices.

Step 3
Click on your device. Select Back Up Albums in the lower left hand corner of the app.
backupalbums
Step 4
Choose the album you want to backup or you can Select All. Once you’ve chosen your photos you wish to backup, simply click Start Backup.
choosealbumstobackup
Step 5
Once your files have finished backing up you can either Open Folder or press Ok. Opening the folder will allow you to view the photos backed up. Pressing OK will bring you to the desktop app again.
backupalbumscomplete
DONE!

Note: Next time you use the backup feature using our app it will only backup the NEW photos. This should make the process go a lot faster.

Authorization “null” Error – How To Solve!

In this walk through we will be explaining how to overcome the error Authorization “null” when trying to transfer between two iDevices. For example: iPhone to iPad.

Note: Our app requires this authorization to protect your privacy and only allow the connection to the devices that you authorize in the same network

Step 1
Make sure you are using the latest version of our app which is currently 4.7 for iOS devices and 2.6.2 for Android devices.

Step 2
Open the Photo Transfer app on both devices. After touching the “Explore Device” or “Get Photos and Videos” button you will then be prompted to authorize the connection between the two devices.

iPhone:
selectphotosiPad:
ipadgetphotosnvideos

Step 3
Allow authorization to both devices. Below you will find screenshots of what the sending and receiving devices should display.

iPhone screenshot

iPhoneauth

iPad Screenshot ( receiving device )
ipadauth

Once you tap on “try again” after allowing authorization you will then be able to transfer to/from your devices.

Done!

How to transfer photos from your device to your Windows computer via any web browser

This is a walk through on how to transfer from your device to windows computer and how to unzip your files via the web browser interface.

ON DEVICE

Photo Transfer App

1. Tap on Send photos & videos

Photo Transfer App

2. Tap on Windows Computer

Photo Transfer App

3. Tap on Start Here under Use Web Browser on your Windows Computer

________________________

ON WINDOWS COMPUTER

1. Go to the web address provided by our app: http://connect.phototransferapp.com

2. Insert the IP address our app gives you. Make sure you keep the app running on your device and make sure that you type the IP address exactly as it appears in our app.

Inserting the IP address

Click CONNECT once you’ve inserted the IP address

3. To start choosing your photos (or videos) to transfer click on the empty photo icon or Select photos & videos

step2computer

4. Select the photo album or camera roll you want to transfer from. You can either click on the photos you want to transfer ( any photos selected will be indicated with a check mark) or you can click on Select All in page. This will select all the photos on that page to download.

Once you’ve finished selecting your photos click on View & Download

step4computer

5. Click on Full Resolution to start the downloading process. Note: You can also choose to select medium resolution. Also from this page you can view the photos you are transferring.

previewyourphotos

6. A dialog box will pop up asking you to save a Photos.zip file. Click OK.

zipexample

7. Once the Photos.zip file is on your windows desktop (or wherever your downloaded content is downloaded too) then Right Click and select Extract All. This will extract your photos in a full resolution to your desktop as a photos folder titled photos

Click EXTRACT ALL

Click EXTRACT ALL

DONE!

Creating Ad-Hoc (Computer – Device) Local Network on Mac Computer

Devices

This is the solution for you, If you are using a hotel, corporate, or public network which in some cases are configured to prevent communication between devices.
If this is the case you can create an ‘ad-hoc’ network between your Mac computer and iPhone, iPad or iTouch.

Turn Wi-Fi On1. “Turn Wi-Fi On”, on your Mac computer.

Create Newtwork

2. Click “Create Newtwork …”

Network Name

3. When this box pops up, in “Network Name” field enter desired name of your network.

Security 40-bit WEP

4. and for the Security, choose: “40-bit WEP”

Choose your password

5. Choose your password containing: 5 letters or 10 numbers. (no more or less).

ex: “johns” or “1234567890”
(The password must be entered as exactly 5 ASCII character or 10 hex digits.)

6. Click “Create”

your connection is created

Your Wi-Fi Icon will change in the new icon , signaling that your connection is created.

My Connection

Ad-Hoc Connection is created, and now you can go to your iPhone, iPad or iPod touch and connect to you newly created connection, in this example called “My Connection”.

Joining the newly created AdHoc network on your iPhone, iPad or iPod touch

Settings

1. Tap “Settings” App.

Wi-Fi tab

2. Choose “Wi-Fi” tab.

List of Available Networks

The list of available networks will show up, as well as your new connection, in this example it is “My Connection”.

3. Select your Network, and you will be prompted to enter the password we created before.

Select your Network

During the time your computer is hotspot you won’t be able to access internet. This is exclusive local connection, in this case between your computer and your iPhone, iPad or iPod touch.

  It takes about 10 seconds for connection to be established. Do not open the Photo Transfer app until you see your connection is selected and active, and the Wi-Fi icon must shows up in the top left angle of your device.

connection is selected and active,

4. Now run Photo Transfer App on your iPhone, iPad or iPod touch and start transfering your photos and videos to your Mac computer.

run Photo Transfer App

Troubleshooting connection problems between devices:

Devices

  • Double check that both devices are connected to the same Wi-Fi network.
  • Both devices need to be running ‘Photo Transfer App‘.
  • Quit the app on the sender device and start it again. Then use the ‘refresh devices‘ to look for the sender again.
  • Are you using a hotel, corporate, or public network? Some networks are configured to prevent communication between devices. If this is the case please try using a different Wi-Fi network.
  • If you are using a home network it may help to reset your Wi-Fi router and join the network again on both devices.
  • Please quit any other application streaming data to your computer like a ‘Skype’ call or an internet radio station as these services may interrupt the connection between the devices.

Problems connecting FROM Computer

Devices

  • Double check that your device and your computer are connected to the same Wi-Fi network.
  • The screen of your device must be active (screen on) and ‘Photo Transfermust be running when you attempt to connect.
  • Type the address on your computer’s web browser exactly as it appears in the application including the ‘http://‘ part. Make sure that you type it directly in the address bar and not in the search bar
  • It may take couple of attempts to establish communication between your device and computer.
  • Are you using a hotel, corporate, or public network? Some networks are configured to prevent communication between devices. If this is the case please try using a different Wi-Fi network. You can also create an ‘ad-hoc’ network between your computer and device. Ad-Hoc Tutorial for Mac
  • If you are using a home network it may help to reset your Wi-Fi router and join the network again on your device and your computer.
  • Finally, please quit any other application streaming data to your computer like a ‘Skype’ call or an internet radio station as these services may interrupt the connection between your device and your computer.

EXPLORE & TRANSFER Photos & Videos FROM Another iPhone/iTouch TO an iPhone or iTouch

Devices

NEW FEATURE!
– iOS6 ONLY!

“EXPLORE DEVICE

Explore Albums, Preview and Select photos & videos from another device.

Note: To transfer photos & videos between two devices both of them must have this application installed and running. Make sure that both devices are connected to the same Wi-Fi network.

Photo Transfer App

1. Open ‘Photo Transfer’ app and touch “RECEIVE” button.

Photo Transfer App

2. Touch the “ANOTHER Device” button.

Photo Transfer App

3. Select device you want to Explore & Tap the “EXPLORE Device” button to explore albums on the sender’s device.

Photo Transfer App

4. SELECT photos and videos you want to transfer.

Photo Transfer App

5. Tap “TRANSFER SELECTION” button.

Photo Transfer App

6. Choose where you want to save photos, Existing album, Create New Album by pressing [+] button, or Send photos to App Link compatible app.

7. Press “TRANSFER” Button to start the transfer.

Done!

To view the photos or videos you transferred, open the ‘Photos’ app on the receiving device.

EXPLORE & TRANSFER Photos & Videos FROM Another iPad TO an iPhone or iTouch

Devices

NEW FEATURE!
– iOS6 ONLY!

“EXPLORE DEVICE

Explore Albums, Preview and Select photos & videos from another device.

Note: To transfer photos & videos between two devices both of them must have this application installed and running. Make sure that both devices are connected to the same Wi-Fi network.

Photo Transfer App

1. Open ‘Photo Transfer’ app and touch “RECEIVE” button.

Photo Transfer App

2. Tap on the “ANOTHER Device” button.

Photo Transfer App

3. Select device you want to Explore & Tap the “EXPLORE Device” button to explore albums on the sender’s device.

Photo Transfer App

4. SELECT photos and videos you want to transfer.

Photo Transfer App

5. Tap “TRANSFER SELECTION” button.

Photo Transfer App

6. Choose where you want to save photos, Exsiting album, Create New Album by pressing [+] button, or Send photos to App Link compatabile app.

7. Press “TRANSFER” Button to start the transfer.

Done!

To view the photos or videos you transferred, open the ‘Photos’ app on the receiving device.

TRANSFER Photos FROM iPhone or iTouch to another iDevice using Bluetooth

Note: To transfer photos & videos between two devices both of them must have this application installed and running. Make sure that both devices are connected to the same Wi-Fi network.

SENDER Device:

Photo Transfer App

1. Open ‘Photo Transfer’ app and touch “SEND” button.

Photo Transfer App

2. Touch the “ANOTHER Device” button.

Photo Transfer App

3. Tap “SELECT” button to selct photos you want to send than tap “USE BLUETOOTH”.

Photo Transfer App

Make sure that Receiving device is on the Receive screen (follow next steps to get there).

4.  Than, Tap “ENABLE BLUETOOTH” button on both devices and follow the on-screen instructions.

RECEIVING Device:

Photo Transfer App

1. Open ‘Photo Transfer’ app and touch “RECEIVE” button.

Photo Transfer App

2. Touch the “ANOTHER Device” button.

Photo Transfer App

3. Touch the ‘USE BLUETOOTH‘ button on both devices.

Photo Transfer App

4. Then, touch the ‘ENABLE BLUETOOTH‘ on both devices and follow the on-screen instructions.

Photo Transfer App

5. Touch the “GET PHOTOS“.

Photo Transfer App

6. Choose location (Album or App) where you want to save your photos.

7. Press “TRANSFER” button to start the transfer.

DONE!

TRANSFER Photos & Videos FROM another iPhone or iPod touch TO an iPhone/iPad

Note: To transfer photos & videos between two devices both of them must have this application installed and running. Make sure that both devices are connected to the same Wi-Fi network.

Photo Transfer App

1. Open ‘Photo Transfer’ app and touch “RECEIVE” button.

Photo Transfer App

2. Touch the “ANOTHER Device” button.

2 – 1On the Sender Device SELECT (see how) photos & videos you want to transfer to this device.

Photo Transfer App

3. Tap “GET Photos & Videos” button to start transfer.

Done !

If the devices are not detecting each other please read this: Connecting Devices.

To view the photos or videos you transferred, open the ‘Photos’ app on the receiving device.